How to Use EaseData: A Step-by-Step Guide
EaseData: Cheapest Data/Airtime Platform In Nigeria

How to Use EaseData: A Step-by-Step Guide
EaseData is designed to provide a seamless experience for its users. Whether you’re an individual, business, or agent, getting started on EaseData is easy. Follow this detailed guide to register and create your account on the EaseData platform.
Registration Process
- Visit the Official Website
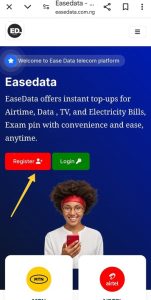
Navigate to the official EaseData website at www.easedata.com.ng using your browser. - Click on the “Register” Button
Locate the “Register” or “Sign Up” button at the top right corner of the homepage and click on it. If you are already a registered member, click “Login”
- Fill Out the Registration Form
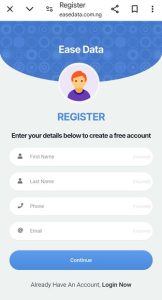
Provide the required details in the form, including:- First Name
- Last Name
- Email Address
- Phone Number
- Password (Create a strong and secure password)
- Confirm Password (Re-enter the password for verification)
- Create Transaction pin. The transaction pin is 5 digit. Ensure you write it down in a safe and secure place. You will need it to carry out transactions in the dashboard.
- Agree to the Terms
Read and accept the platform’s terms and conditions by checking the required box. - Email Verification
- After submitting the form, check your registered email inbox for a verification email from EaseData.
- Click on the verification link provided to activate your account.
Setting Up Your Account
- Log In to Your Account
Once your email is verified, return to the website and log in using your email address and the password you created. - Complete Your Profile
Navigate to your profile section and fill in additional information such as:- Address
- State
- Local Government Area (LGA)
- Account Type (if applicable)
- Customize Your Settings
- Set up security questions and answers for account recovery.
- Enable two-factor authentication (2FA) for added security.
- Explore the Dashboard
- Familiarize yourself with the EaseData dashboard.
- Access services, manage transactions, and monitor your activities seamlessly from this central hub.
Tips for Using EaseData Effectively
- Ensure Accurate Information
Always provide valid and up-to-date details during registration and profile setup. This ensures a smoother experience and prevents service disruptions. - Secure Your Credentials
Use a strong password and never share your login details with anyone. Activate 2FA for extra security. - Stay Updated
Regularly update your account information and preferences to reflect any changes. - Utilize the Help Center
If you encounter any issues, refer to the platform’s Help Center or contact customer support for assistance.
By following these steps, you’ll be fully equipped to use the EaseData platform to its full potential. Start managing your tasks efficiently and enjoy the seamless user experience offered by EaseData today!
Becoming a Vendor, Reseller, or Agent on EaseData
Are you ready to enhance your EaseData experience and unlock exclusive benefits? EaseData provides exciting opportunities for customers to become Vendors, Resellers, or Agents, allowing you to enjoy discounted rates, rewards, and more.
Requirements to Become an Agent
To upgrade your EaseData account to an Agent, ensure you meet the following requirement:
- Account Balance: You must have at least ₦200 in your EaseData wallet. This amount will be debited as part of the upgrade process.
How to Upgrade to an Agent
Follow these simple steps to become an Agent:
- Log In: Access your EaseData wallet dashboard using your login credentials.
- Select “Agent”: Locate the “Agent” option in the upgrade section.
- Authenticate: Enter your transaction PIN to confirm the upgrade.
- Submit: Click the “Submit” button to complete the process. You’ll receive a confirmation of your upgrade.
Requirements to Become a Vendor/Reseller
If you’re interested in becoming a Vendor or Reseller, ensure you meet the following requirement:
- Account Balance: You must have at least ₦300 in your EaseData wallet. This amount will be deducted upon upgrading.
How to Upgrade to a Vendor/Reseller
The process for upgrading to a Vendor/Reseller is similar to upgrading to an Agent:
- Log In: Access your EaseData dashboard.
- Select “Vendor/Reseller”: Choose the appropriate upgrade option from the menu.
- Authenticate: Input your transaction PIN to proceed.
- Submit: Click “Submit” to finalize your upgrade. Once approved, you’ll have access to vendor-exclusive features.
Benefits of Becoming a Vendor/Reseller or Agent
Upgrading your EaseData account comes with various perks, including:
- Discounted Service Rates: Enjoy the lowest prices on services, ensuring higher margins for reselling.
- Exclusive Rewards: Gain access to reward packages, bonuses, and special promotions.
- Priority Support: Benefit from faster and more personalized customer support.
- Enhanced Dashboard Features: Unlock additional tools and features to manage your transactions efficiently.
Why Upgrade Your Account?
Upgrading to a Vendor/Reseller or Agent status is a fantastic way to grow your business and maximize your EaseData experience. Whether you’re reselling data, airtime, or other services, the discounts and rewards you receive will give you a competitive edge.
Don’t wait! Upgrade your account today and start enjoying the perks of being an EaseData Vendor, Reseller, or Agent. Visit www.easedata.com.ng to begin your journey!
Step-by-Step Guide to Add Money to Your EaseData Wallet
- Log In to Your Account
Begin by logging into your EaseData account. Visit the official website at www.easedata.com.ng and enter your login credentials to access your dashboard. - Navigate to Wallet
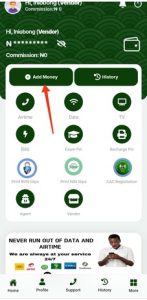
Once logged in, go to your wallet section on the dashboard. This is where you can view your current balance and manage transactions. - Select “Add Funds”
In the wallet section, locate and click on the “Add Funds” or “Deposit” option to initiate the process of adding money to your account.
- Choose a Payment Method
EaseData offers multiple payment options for adding money to your wallet. Select a payment method that suits you. Common options may include:- Bank Transfer
- Debit/Credit Card
- Mobile Money (if available) or contact admin to send funds.
2. Enter Deposit Amount
Enter the amount of money you wish to add to your wallet. Make sure the amount is within the available limits for your chosen payment method.
3. Complete the Payment
-
- If you’ve chosen Bank Transfer, you’ll be provided with EaseData’s bank account details. Transfer the specified amount and follow the instructions to confirm the payment.
- For Debit/Credit Card payments, enter your card details securely and confirm the payment.
- If using Mobile Money, follow the prompts for a seamless transfer.
4. Confirm Payment
After completing the payment, return to your wallet section to check your updated balance. If the transaction was successful, the funds will be added to your EaseData wallet.
Tips for Adding Funds to Your EaseData Wallet
- Ensure Payment Accuracy: Double-check the payment details to avoid errors during the transaction.
- Security: Always use a secure internet connection when adding funds to your wallet. Avoid using public Wi-Fi to complete financial transactions.
- Payment Confirmation: Keep an eye on your email or SMS for confirmation of your deposit, especially when using bank transfers.
What to Do if Your Funds Aren’t Reflected
If your added funds don’t appear in your EaseData wallet within a few minutes, here’s what you can do:
- Check Transaction Status: Ensure the payment went through by reviewing your bank or payment provider’s transaction history.
- Contact Support: If the funds still aren’t reflected, reach out to EaseData customer support with your transaction details for assistance.
